Showing posts with label fabric. Show all posts

Throwback MD: FREE STUFF!

It's been a long and difficult week for we Mighty Distractible gals.

Cassandra has pneumonia and the rest of her family is alternately sick with fever, snotty noses, and puking. And I, of course, managed to catch a devil of a cold - the result of working in a corporate petri dish and having a slightly compromised immune system - which caused me to be foggy-headed and miss work.

So, it's a "Throwback Thursday"... The only way a post was going to make it up this week. But I think it's a good one - especially as we're in the throes of holiday crash-and-burn crafting. 

Send good vibes for speedy recoveries on all fronts and, hopefully, we'll have something new for you next week. 

- Alex  *cough, sneeze, blow*

=================================================

ORIGINALLY POSTED: Wednesday, November 17, 2010

Everybody Loves Free Stuff

Ah, the holidays! It's a time of...well...stress, frankly. And the source of that stress? (besides family of course) Gift giving.

What started as a simple gesture of generosity, love, and friendship has turned into a billion dollar industry with layers of guilt and inadequacy piled on top. Just makes you all tingly for the season, doesn't it?

Between having to find the "perfect" gift for every Tom, Dick, and Harry in the phone book and the cost associated with that quest, the holidays are more of a nightmare than a hot chocolate-filled dream.

On top of it all, we crafters get to experience our very own extra-special gift stress. Here's how it works:

1. Crafter says: "I'm going to put 75 hours of my time, plus the cost of materials, into this handmade item. I am going to meticulously choose a pattern and colors that will be perfect for the receiver. I'm going to craft every bit of this with love and care for this special person."
2. Receiver opens gift and says: "Oh, isn't that pretty. Thanks!" and moves on to the next gift.
3. Crafter is crushed.

Ralphie's aunt worked hard on this
Do you see what's happening here? There's a huge disconnect between the crafter's and non-crafter's perceived value of the gift. I have family members that would be appalled if I gave them something handcrafted - regardless of how expensive and lovely the materials and finished product. I mean...only poor people and hippies "do" crafts, right? On top of that, it's hard to convince a non-crafter of an item's value when a machine-made, off-the-rack version is cheaper and looks as good. The industrial revolution really took it's toll on handcrafting, in a lot of ways.

When it's all said and done, if you want to give a handcrafted gift, the key is to keep your costs and efforts down and make the actual value of the present a little closer to the perceived value (and save yourself some soul crushing.) Here are my tips:

Use free patterns.

I can't remember the last time I paid for a pattern because there are tons of resources on the web. Granted, you may only be saving $5-$10 but, if you're making more than a couple of handmade items, this can add up quickly. My favorite resources are:

1. Ravelry - Also known as "Facebook for knitters." There are, literally, thousands of amazing free patterns (as well as patterns for sale) on this site. The very best part is that, for most patterns, you can look at other people's attempts at making the piece. This gives you invaluable insight into the pattern's difficulty level and flaws. I can't recommend this site enough.
2. All Free Sewing - This site is incredibly comprehensive - with patterns for everything from accessories to quilts to holiday projects. The clean and easy interface makes searching for patterns a breeze. The site even has video tutorials. You are going to love this resource.
3. Craft Bits - Most of the free-craft project sites online are aggregators - they gather links to free projects on myriad other sites. Craft Bits, as best I can tell, has all "original" content so you're not popping off the site every time you click a project link. I also really like the site design and I find the projects appealing. One specific tip for this site: scroll down! There's tons of content below the fold on every page. It's easy to miss it if you don't think to scroll.

Keep materials cost in line.

Let's be honest, it's easy to want to buy that gorgeous yarn that's $20 a skein because the scarf is for your mom. But, honestly, she'll probably never be able to tell the difference between that and the $10-a-skein version. The key to this one is: know your audience. If the person you're crafting for has an eye for good materials and you KNOW they'll appreciate the color or hand of the piece at the end, go ahead and look for the material on sale somewhere. Otherwise, buy materials that are "good enough" to make the piece nice but not over-the-top. My favorite resources for reasonably-priced and sale goods are:

1. Knit Picks - Knit Picks is an all-around great site for yarn crafters. They have beautiful tools, like their interchangeable circular needles set (I seriously covet these), but they also have great basic yarns for ridiculously low prices.
2. Fabric.com - This clean and easy-to-navigate site is one of my favorite resources for fabric. Their selection can be light - especially in specialty fabrics, like decorator (upholstery) weights - but most of the time, the styles are really tasteful and the brands are higher-quality. The thing I love most about this site (besides the amazing prices) is that, under each fabric "swatch", they list the number of yards they have in stock. Saves me tons of time if I know how much yardage I need.
3. Joann.com - You may have a Joann Fabrics in your area so this may be redundant but... not for nothin' Joann is a great resource for craft supplies and their online store has damn-near anything you'd need. The quality tends towards the middle and the prices are reasonable (not super-cheap) - but you can be assured that they have what you need and that, if you need to return anything, their customer service will do you right.

The 5-minute Skirt: http://bit.ly/WaK1o
Finally, don't pick difficult projects. This one is easy, people. If it's a gift, make it something you can complete with plenty of time to spare and that it's easy enough that you won't be struggling. That way, you'll spend less total time on the project and your finished piece will be top-quality because its instructions will be well within your comfort zone.

So, there you go. My tips for making the 2010 holiday season a little less stressful. I think what it boils down to is this: if the person you're making a gift for won't appreciate the time, money, and effort that went in to your handmade creation then to heck with 'em. Go buy them something that they've seen on TV and save yourself some heartache. ;)

- Alex (bah-humbug)

Gumdrop Pillows

Hi everyone!

On Sunday Alex and I got to have some fun. We met our friend Missy down at a wonderful local fabric store, The Sewcial Lounge, and took a class on the Amy Butler Gumdrop Pillows.


The three of us have been wanting to make these gorgeous tuffets for ages. The only thing holding us back was the cost of so much fiberfill...seriously, it takes an insane amount of those little bags you get at the craft store to fill up one of those pillows. But the cost of this class was reasonable and included the fiberfill. Perfect!


It was a blast. We laughed, sewed, nibbled on snacks, and stuffed those pillows for a half hour until they were full! Our teacher was the owner, Sara. What a doll. So sweet and helpful. I've taken many classes in my day, but I've never had a teacher who jumped in when you weren't looking and pinned your pieces or pressed your seams. She was a master at making a class clip along and gave invaluable tips and tricks that the pattern never mentioned. I would definitely take a class from her again.

Stuffing action shots:


The pattern itself was really pretty easy. We finished our projects during this three hour class. As a matter of fact, each of us has the notion to make more of these soon. By hook or by crook!

Mine.
Alex's
Missy's

Seriously, how adorable are these?

Cassandra

Britex

Okay, okay...I promise I'll stop talking about San Francisco after this post.

There wasn't a lot of time on my trip out west for the crafty shopping I really wanted to do...but I was able to pay a visit to one fabric/notions store. Whoa, what a store it was!

Check out that sign!

Britex is 3 stories of AMAZING. Two floors of fabric and one floor of ribbons, trims, and buttons. I could have actually moved in the decorator fabric section and lived there for a month or so. The fabrics were that luxurious.

Velvet beauty.
I was kicking myself for not having a dress pattern in mind because the selection of dress fabric was staggering. I'm pretty sure if I lived near that store I would have a handmade wardrobe. Sure, I could order this sort of fabric online, but seeing it in person has so much more impact.

The section I spent the most time devouring was the quilters cotton. I'm currently in the throes of making a quilt for my little bear and finding something to add from my trip sounded like a great idea. Sadly, the quilter's cotton selection was really small compared to the other fabrics they carry. Still, I found a few fun prints!

My booty.

You want to know something interesting? They don't have cutting tables at Britex. When you find a fabric you want, a sales clerk comes over and tears it off the bolt. I loved it! No standing in a cutting line!

Lately, I've been sewing and sewing. The new quilt I'm making has 15 log cabin blocks and I'm powering right through them. It's amazing...when you can see your own skill level move from beginner to intermediate, you know you're on your way.


–Cassandra

PS - Britex has an online store too!

Friday Finds: Killer Spoonflower Artists

Lately every time a fabric on Pinterest catches my eye, it's from Spoonflower. Man, that's where the really talented fabric designers live these days. You pay more for the fabric on that site, but if you want something special there's no comparison.

Today for "Friday Finds" I thought I'd spotlight a few talented Spoonflower designers I've stumbled upon recently.

Happy Friday everyone,

–Cassandra


Jordan Elise

Unusual Specimens by Jordan Elise


Becky Long

Forest Friends by Becky Long


Nadia Hassan

A Rain(bow) of Arrows by Nadia Hassan

Friday Finds: Great Yarn Deals

I'm sure that all of you are, at least, passingly familiar with Craftsy - the online community that offers classes in knitting, sewing, and much more.

But did you know that Craftsy sells yarn and fabric? And sometimes at bargain basement prices? HOLY CATS. Look at my recent haul:


This is 20 skeins of Cascade 220 Heather and 2 skeins of Cascade Pure Alpaca (in the most scrumptious colors!) My entire order was $101.55. Seriously. The shipping was free - maybe because I spent over a certain amount, I can't remember. But, regardless, this is insane. My average price per skein was $4.64. For Cascade. And alpaca.

So... you can simply check Craftsy's "shop" tab occassionally for deals or, if you're a Facebook sort of person, you can follow a page called the Knitting Club. They post all the Craftsy deals as they're happening. That's how I found out about the Cascade sale. :)

Have fun shopping!

- Alex

P.S. As of about 3 minutes ago, we are officially PUBLISHED!

Wow. Just, Wow.


Every now and again people surprise me in a big way.

A couple of weeks ago, in upholstery class, I finished covering the core of my current chair. All that's left to do is make the cushion covers for the back and the seat. Because of the size of the cushions and the "grain" of my fabric, I need about 3.5 yards to finish up. Can you guess where this is going??

I laid out the cushion cover "patterns" (aka: the deconstructed old covers) on my remaining yardage and my heart sank. I only had enough to do one side of each cusion and MAYBE, if I cut it well, I'd have enough for the boxing, which is that vertical piece that fits between the top and bottom of the cushion. I talked it through with my instructor and figured out how much additional yardage I'd need. So... no big deal. I'd just stop at Joann Fabrics over the weekend and pick up what I needed.

Oh... the optimism of an occasional sewer.

I'm sure that those of you who work with fabric more often than I are aware of the nuances of buying fabric. Things like "exclusive" to a store means that you can't buy it ANYWHERE ELSE. And that you should probably buy what you need up front because anything can be discontinued at any time.

Yeah. Totally discontinued. All that was left in the store was the 8x8 fabric swatch (which I bought). The manager confirmed that there was none at the other store in town or in the warehouse. He recommended that I check the website. I left the store feeling desolate and angry and I checked Joann.com as soon as I got home.

sad, little 8x8 swatches

All that was available on the website were 8x8 fabric swatches. Well, at this point I was desperate so I put a bunch of the swatches in my shopping cart. I figured that, at least, I could make a "patchwork" underside for the cushions in the correct fabric.

Two days later my phone rings and it's a number I don't recognize so I let it go to voice mail. Turns out that it was Wendy from Joann Fabrics' fulfillment center. She called to make sure I understood that I was ordering swatches and not yardage. LOL!  So, I called her back and got HER voice mail. I left her a message telling her my tale of woe and explaining why I was buying all the swatches. Then I half-jokingly added that, if she could find any yardage anywhere, I'd pay anything for it.

Well... two days later and my phone rang again. I recognized the number this time so I answered. Wendy had located yardage!!!!! I nearly fell on the floor. She went on to explain that it's against policy to ship discontinued fabric between stores so she was going to have to work out the logistics. I told her to order me five yards (not taking any chances this time!) if they had that much. About an hour later I got a call that the fabric was shipping to my local Joann's and that the store manager would call me when it arrived. A few days later my local Joann's manager called me with the good news - the fabric was in her store! It was a March Miracle. Seriously.


This kind of "above and beyond" service is pretty rare these days so, when it happens, I'm always sort of gobsmacked. And, no offense to Joann Fabrics, but I never expect this level of help from them. I shop there often and have come to expect very little. A perfect example is the fact that the local stores don't have access to the store inventories on a national level. My fabric was found in a store in Texas. However, my local store would never, ever, know that. And, even if I got on the phone and called every Joann's in the country, the best they could do would be to ship the inventory to my local store. In other words, I couldn't pay the Texas store for my yardage and have them ship it directly to my home. This seems like a flaw. The other rule that baffles me is the "no shipping of discontinued merchandise". I mean... if a customer wants the last of your discontinued "exclusive to Joann" fabric, you'd think you'd want to get rid of it quickly.

Regardless of these gripes, I don't have enough words in my vocabulary to describe how happy I am to have my fabric and how incredibly grateful I am to Wendy for going above and beyond. It's people like her that will keep me shopping at their stores.

Here's to more great customer service experiences in our lives!

- Alex

Applique Blocks- Episode 1

For me, ideas start with a small sketch.


Then, it's time to figure out how to turn the idea into reality. And next thing you know, I am learning how to make an applique quilt block. And sharing it with you...

There are many different types of applique quilt blocks. Just do a Google image search for them and you will see beautiful floral motifs, cute animals, and, as always, some odd stuff that makes you remember that there are all kinds of tastes out there. What they all have in common is this, layers over layers of shaped pieces of fabric.

What do I mean by that? To put it simply, when you have a design in front of you, take note of what graphic elements are on top of one another. Take a look at the detail of this sketch below. If I wanted to create this in fabric, I have to start with what element is in the back of the drawing. In this case, that would be the hill on the horizon. (Look for the light, horizontal line behind the trees.)


From there I build up my image. Tree trunks, then greenery, then boat parts, etc. You can sketch it out and work in free-form like I am here, or you can get yourself a pattern and work more traditionally. Either way, the process of constructing the applique is the same.

I find it easier to work on applique blocks if I give myself some room beyond the finished size. (Partly because I am prone to adding embroidery elements on the block and I need some extra fabric around the edges so I can use a hoop.) I cut a piece of backing fabric larger than I need and I use a water-soluable marker and mark off the "live area" on my block (what will show on the quilt front) and the seam allowances. Like so:


Depending on your pattern, your backing fabric may be a design element or not. Pay attention to that when choosing your fabrics.

Once you have your backing fabric ready, and have decided what order the pieces need to be layered to create your image, and have shopped for the most gorgeous fabrics you can find...you need to run to the grocery store and buy yourself something called Freezer Paper.

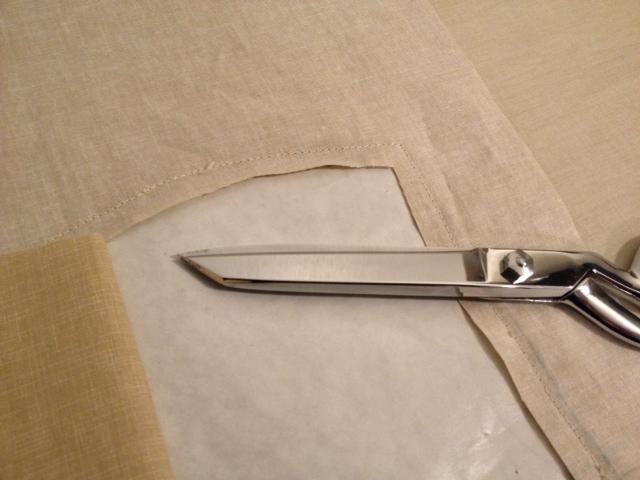
This magical stuff has one side that is like white deli paper and the other side is some sort of waxy plastic. This is what you will use to create the shaped pieces that make up your design. You can draw your image on the paper side, cut it out, and then iron the waxy side on to your fabric...and it sticks and removes without a film. Told you it was magic.

I drew on the paper and cut out the shape of the hills in the background of my sketch (You may have noticed that the finished block is a different shape than the original sketch. That is how I roll.) and ironed the waxy side onto a piece of fabric. Please note: it is more effective to "press" your iron in a stamping motion when you want the freezer paper to stick to the fabric. Running it across like you were ironing a shirt will just make the paper curl.


Using the attached paper as my guide, I cut out my hill in the fabric, leaving about a quarter inch seam allowance around the edges. Then I peeled off the freezer paper.


Turning my piece of fabric wrong-side up, I placed the same cut piece of paper I just peeled off (this time waxy-side up) on top of the fabric (making sure the seam allowances are even) and started pressing the seam allowance over onto the waxy paper.


It is important to clip seams as you go so that your design looks smooth.


Then, I placed the hills piece on my backing piece, and pressed the two together. It only stuck so well so I pinned too.


Then I stitched the two together leaving about 1/8" seam allowance.


When edges were stitched together, I took the block over to the cutting table and flipped it over. It was time to remove the paper trapped inside. I carefully cut away the backing fabric (leaving about a 1/4" seam allowance) from behind the hills applique.


Then, I grabbed hold of the paper and tugged it loose:

This green piece anchors the bottom of the design, so I did not stitch the bottom edge because it gets caught in the seam allowance. Otherwise, I would have.

Flipping the block back over, I pressed it out and began preparations for adding the next piece. Which, I will tell you about next week... :)

–Cassandra

PS - Click here for Episode 2!


Embroidery School: Lesson 1

As promised, I'm going to talk some more about the technical side of embroidery. Please be aware that I'm a self-taught needle worker. I have no credentials from a prestigious school, but I am an avid reader and researcher (hell, lets just say obsessive). The bits of knowledge that I have picked up over the years has allowed me to create some fun embroidered objects for my home.


Lets start with 3 basic tools:


Fabric
100% Cotton quilter's fabric, flour sack, muslin, or light linen are great places to start. These more open-weave fabrics accept embroidery stitches with ease. Plus, these fabrics are so versatile. They can be made into wall art, pillow fronts, quilt blocks, clothes, dish towels, etc.

A basic white muslin is the perfect blank canvas.
Denim and wool felt are also fun fabrics to embroider. Their natural stiffness lets you embroider without much danger of puckering.

Check out this wool felt embroidered toddler cape. Those embroidered Hindi deities are most excellent!!
You can spend a lot of money on fabric, or not. Really, it depends on the project you're making. I tend to buy the best I can afford at the time. The way I figure it, you're putting a lot of time into something...why not make it built to last. And if you're planning on embroidering a heavy pattern on a thinner material such as quilter's cotton, you might want to add a stabilizer to prevent puckering. These come with all sorts of options. Tear away, iron-on, water-soluble, etc. I have even backed a piece of quilter's cotton with a thin basic muslin and stitched through both layers. It worked great! But, if you're a beginner you might want to consider simple patterns that don't need stability to start. It will be easier.

Hoops
A hoop is used to pull you fabric taught so that the tension of your stitches will be uniform. I can't imagine trying to embroider a piece of cotton without a hoop.

Look at the pretty wood hoops!

There are some really beautiful wood hoops out there. Maybe one day I will buy one...or I will continue to use "old trusty" (aka my 7" plastic hoop I've had for the last 20 years). I have no idea where it was purchased (I am guessing a variety store) and I'm sure it was cheap, but I can't justify tossing it. Still a functional item, it holds my work tight through all my crafty adventures.

From what I've read and experienced first hand, the 5" and 7" sizes are the most versatile. As a beginner, investing in one of these sizes will give you the ability to tackle lots of projects.

Some folks like to wrap their smaller, inner hoop with twill tape. This protects the fabric and previous stitches. It is personal preference. And on the subject of protection... never, never, never, leave your work in the hoop when you are not working on it. From my experience, you will get deep creases and crushed stitches. Bad idea.

Needles
An embroidery needle is much like a regular hand-sewing needle. The difference is that the eye is a bit larger (to accommodate threading floss) and they are quite sharp. These can be purchased in different thicknesses depending on the floss and fabric you have chosen. It is pretty self-explanatory once you have a pack of them in front of you.

Clover No. 3-9 Gold Eye Embroidery Needles, Pack of 16
A basic pack of embroidery needles.

The type of needlework you are doing will require different sorts of needles. Crewel, tapestry, and embroidery needles are quite specific for their functions. When doing embroidery, you want to choose a needle packaged specifically for that task.

My goal with these posts on the tools and techniques of embroidery is to help take out the mystery of how to get started if you are new to this craft. I truly hope this information is useful. Please feel free to leave a comment or send us an email with questions on these tutorial posts.

Next time, I will discuss floss and design options. Have a great week!

Embroidery Lesson 2 is now available! Click here.

–Cassandra


Buried Alive

June is always a really busy month for me with family obligations, travel, house chores, etc. Consequently, I have very limited time to "create." Not having the space to focus on my projects makes me realize how important this part of my life really is. It is my meditation, my way of centering myself. 

Since my time to actually "do" crafts is limited, I am using this fallow time to step back and do some planning. I keep my eyes open when I'm out and about and look for inspiration. During downtime in the car, I can read about possible new projects or surf the web for patterns and ideas. One of my favorite planning activities is finding out-of-the way places to source my materials - cool little online shops or even brick and mortar shops in a town we're passing through. All this research gets me excited about the projects that I have coming down the pike.

I thought I would share with you today some of the places I have been looking...and finding much inspiration....

Vintage Fabric Prints
Children or adult themed patterns from the 1930's have been calling to me. While I love the more modern prints I wrote about here a couple weeks ago, something makes me think that I need to make a project (or two) out of something old school. A quilt perhaps...or maybe just some summer-weight pajamas for little boys. It is possible that the advent of antique fair season is responsible for this inspiration.

I found this little company called Warm Biscuit that carry some really fun vintage kids prints. They don't have a ton, but what they have is intriguing. For instance, their Vintage Italian Alphabet fabric is just stunning.

This might have to become curtains in Little Bear's woodland themed room.
 For more grown-up projects, like quilts or a cute summer shirt for me, I have been peeking at calico. So subtle, so traditional...it harkens back to the depression era sensibility on my mind.

Calicos I found at Moda.
Colors
The world around me is suddenly brimming with color. I live in a valley and the nature surrounding my home is an endless source of ideas for placing unexpected colors together. Green matched with a violet...birds nest brown matched with robin's egg blue. It's all out there, waiting for you to notice it.

Pinks next to greens next to oranges...all in my backyard.
 One of the most wonderful things about the digital cameras is the exposure we now have to photography on the internet. So many people take up a camera and put their work out online for us to see these days. I have friends with formal photography education and thousands of dollars worth of equipment as well as friends with a point-and-shoot camera in their bag and a God-given talent for taking an amazing photo without all the frills. Their images inspire me, the colors especially.

A beauty by my point-and-click photographer friend Troy.
Books and Blogs
One of the things I can sneak in when I have a moment is reading. There is no prep time to dragging out a book or opening my laptop and clicking through to the bookmarks I have to some of my favorite blogs. I can get a lot of inspiration in 15 minutes.

One of my favorite bloggers (Meg McElwee at Sew Liberated) has written another book. I just ordered it yesterday (on the strength of the home-made teepee on the cover) and I can't wait until it comes in the mail! She has great patterns on her site for purchase and her blog is a super resource for sewing tips and tricks.

How could I not order this? I'm sure to be blogging about it soon!
I am a competent seamstress, but recently a very basic beginner's book called Me and My Sewing Machine jumped out at me at the library. This is the best book ever. It goes over the parts of your sewing machine and different sewing techniques (such as zippers or a variety of hems) all in plain English. Even someone like me who has been sewing for 20 (ahem) years can find this useful. It has gone on my must-buy list. This book has really motivated me to sew more often, stretching my comfort zone a bit more each time.

If you noticed, I didn't spend much time talking about knitting today...I guess I have summer fever!

–Cassandra

Quilts Are Calling

Summer has come to Wisconsin like a lion. We went from 50 degrees to 90 in a matter of days. Luckily, the heat stayed at bay until I cast-off one of my large wool projects...the other will just have to wait until fall. It's time to work with cotton fabrics...and maybe even do some hand-work while sitting on the porch sippin' lemonade.

The siren song of making a pieced cotton quilt is calling me. Maybe I'm in over my head... maybe not. For help and inspiration, I bought this book:

The Practical Guide to Patchwork: New Basics for the Modern Quiltmaker

The Practical Guide to Patchwork by Elizabeth Hartman has some really great general tutorials and the beginner projects have very clear directions. After much thought, I have decided that this is where I'd like to start:

I'm going to make the Small Plates quilt...yeah!
It seems like a project that is straightforward enough to be done well by a beginner, yet the finished product is dazzling! I plan on adding colorful hand-quilted elements to really make it my own. (That is a technique I've been wanting to explore for a while.) I hope to share this process that is new to me as I go. Hopefully some of you with quilting experience will post good hints and tips for me in the comments section. Maybe I will even come up with some of my own to share.

As a rule, I like to buy most of my fabric locally if possible...but that doesn't keep me from peeking around online. Fabric is just too fun.

Ooh-la-la... Amy Butler's Passion Collection
Awesome woodland fabric by Antioniamanda on Spoonflower
Mmmm... Bubblegumlove by Anna Maria Horner
I found this intriguing George Washington print on fabric.com
So I will be hunting for just the right fabrics to begin this adventure. If you see an indecisive woman sighing over bolts and bolts of fabric in a local craft supply store in Madison, Wisc., yeah, that would be me. ;)

–Cassandra