Showing posts with label tutorial. Show all posts

Dutchman's Puzzle Quilt Block

 Hi there!

Today I have another beginner quilt block tutorial for you: The Dutchman's Puzzle.


I don’t know the exact origin of the Dutchman’s Puzzle quilt block, but I have read from multiple sources that it has been around since the late 1800’s. Whenever I am stitching one up, I can’t help but think about the generations of women who did the same over the last century. Of course, a lot of these women would have been stitching by hand, or maybe treadle sewing machine...but we have a kinship just the same. 

What I love about this block is the implied movement the rectangles make. Like a windmill...get it....Dutchman’s Puzzle? Even more so than a standard pinwheel block, this pattern looks like it is spinning in the wind. As a rule, my quilts usually are composed of many different types of blocks (because I have a taste for all things chaotic), but this block would really shine used alone.


This is a relatively simple block. It you keep an eye on your seam allowances (make sure they are a scant 1/4”) and remember to press well after each seam....you should do just fine.

–Cassandra

The Dutchman's Puzzle Quilt Block


The finished Dutchman’s Puzzle Block is created from 2 different smaller blocks:


So, you will be making 4 of each of these:


These smaller blocks are technically called “flying geese”. You can find a whole host of ways to make flying geese, but the way I describe it here is my personal preferred method.

This block requires you to purchase 4 different fabrics. You can choose any fabrics you like of course, but I found that my blocks turned out with the most “movement” when I chose a light color with a subtle pattern for A.

Here is how the cutting goes:

Fabric A = cut 12 3.5”x3.5” squares
Fabric B = cut 4 6.5”x3.5” rectangles
Fabric C = cut 4 6.5”x3.5” rectangles
Fabric D = cut 4 3.5”x3.5” squares

Take all of your cut square pieces and using a ruler, draw a line diagonally across the block with a pencil or a fabric pen on the wrong side of fabric.


Time to sew a flying goose! Take a B fabric 6.5”x3.5” rectangle and place it right side up (RS). Place a fabric A 3.5”x3.5” square on top of it so the wrong side (WS) is facing up, lining it up to the right edge. (Both fabrics will have the right sides facing each other.) Pin where indicated. Stitch a seam on the drawn line where indicated on illustration below.


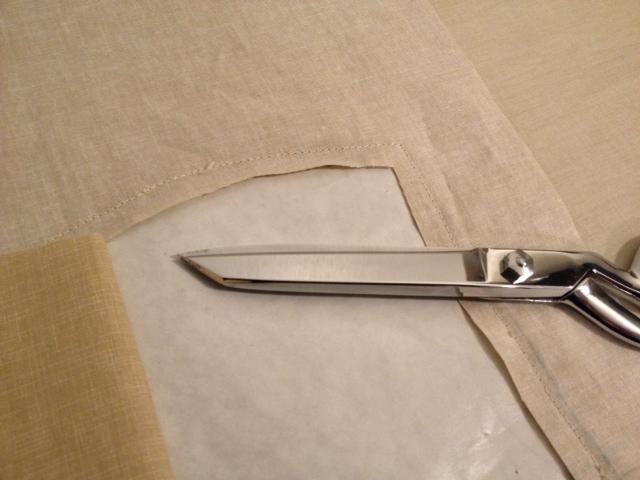
Trim fabric leaving a 1/4” seam allowance:


Set seam by pressing it as is, then fold the flap up and press it open. Have your seam allowance pressed upward as well so that it is underneath A.


The left side will use the same technique. When your flying geese block (including seam allowance) is done it will measure 3.5”x6.5” and look like this:


Then, take the C rectangles and using the same technique as with the B rectangles, sew the A squares and D fabric squares on:


You should now have 4 of each of the 2 flying geese blocks. Stitch one of each blocks together with a 1/4” seam allowance. Then press the seam allowance toward the top.:


The next step is to sew two of these 6.5”x6.5” blocks together with a 1/4” seam allowance. Then press the seam allowance toward the right.:


You’re almost there! The last two pieces stitch together with a 1/4” seam allowance like so:


Press it nice and flat and then you will have a gorgeous Dutchman’s Puzzle block!

Want a pdf of this pattern? Click here to go to Craftsy to download it today!

Friday Finds: Well Mended Wardrobe

Hello folks!

My little boys wear out the knees and elbows in their clothes so fast it would make your head spin. Luckily I've discovered fun tutorials to get some more use out of these torn garments. Hopefully I can share with you some of my creative mending next week. For now, here is a link to a great tutorial from Gabrielle at Design Mom to possibly start you off on your own mending adventure.

Clothes Patching Guide via DesignMom.com
Photo courtesy of Design Mom
Have a great weekend!

Cassandra

Bread Baking Without Fear

I know this is going to sound really melodramatic, but I am on a baking journey. Hopefully at the end of this adventure, me and yeast will be best friends.

Last February, I wrote about conquering a fear of yeast in my cinnamon roll post. And yes, those cinnamon rolls turned out perfectly and were tasty as hell. But honestly, they were friendly little cinnamon rolls. If a girl really wanted to test her yeasty mettle, a loaf of bread would be the next demon to face. And I faced bravely it this past weekend.

The inspiration for my first loaf came from an older blog post written by Alicia on Posie Gets Cozy where she raves about this easy bread recipe on Mother Earth News website. I had seen it a while ago, and finally this past weekend, it was time for me to give it a try. Sooo glad I did. I can't begin to tell you how proud I was taking this gorgeous boule out of the oven. Now it's my turn to rave!

Run to the store and buy the ingredients and you too can make a magical loaf of bread in your own oven. I thought I would share my process with you...it was entirely laid back and easy. It seems like a lot of steps, but trust me, each step is really quick.

This is photodocumention by me...recipe by Mother Earth News.

Ingredients:
1/4 tsp active dry yeast
1 1/2 cups warm water
3 cups all-purpose flour, plus more for dusting
1 1/2 tsp salt

 Dissolve yeast in warm water.
Add the flour and salt, stirring until blended. The dough will be shaggy and sticky.


Cover the bowl with plastic wrap and let rest in a warm room (70 degrees) for at least 8 hours (preferably 12-18).
The dough is ready when it's dotted with bubbles.


Lightly flour a work surface and place dough on it. Sprinkle it with a little more flour and fold it over on itself once or twice.

Cover loosely with plastic wrap and let it rest for about 15 minutes.

Using just enough flour to keep the dough from sticking to the work surface or to your fingers, gently shape it into a ball. Generously coat a clean dish towel with flour, wheat bran or cornmeal. Put the seam side of the dough down on the towel and dust with more flour, bran or cornmeal.

Cover with another towel and let rise for about 1 to 2 hours. When it’s ready, the dough will have doubled in size and will not readily spring back when poked with a finger.

At least 20 minutes before the dough is ready, heat oven to 475 degrees. Put a 6- to 8-quart heavy covered pot (cast iron, enamel, Pyrex or ceramic) in the oven as it heats. When the dough is ready, carefully remove the pot from the oven and lift off the lid. Slide your hand under the towel and turn the dough over into the pot, seam side up. The dough will lose its shape a bit in the process, but that’s OK. Give the pan a firm shake or two to help distribute the dough evenly, but don’t worry if it’s not perfect; it will straighten out as it bakes.


 This little beauty is what was waiting for me at the end of the process. Magic!

 –Cassandra


FaveQuilts Love (& Free eBook!)

I have some fun news to share with you today. Our Log Cabin Quilt Block Tutorial has been included in a new eBook published by FaveQuilts called Patterns for Quilting: 8 Free Block Patterns to Make a Quilt for Your Home!


For those who don't know, Favequilts is a wonderful website that features free quilting content from around the web. You want to know how to sew an hourglass quilt block or maybe make your own bias tape? No problem. Go search their site and you'll find links to some great tutorials by other crafty bloggers like us.

Favequilts has featured quite a few of our tutorials on their site, the most popular being our Log Cabin Quilt Block. It lived on their "What's Hot" list for quite a while and recently we were asked for our permission for them to include it in their new eBook. Considering how many thousands of tutorials live on their site, we were really flattered.

You want to know the best art about this eBook for you? It's FREE. Yep, there's a lot of amazing content in there for nada. If you're a quilter, or want to be, go download your own copy today!

–Cassandra

Friday Finds: Learn to Crochet

Happy Friday everyone!

Today's find is an awesome tutorial I found on Pinterest. Vanessa of the Do You Mind if I Knit blog created the best crochet how-to I've ever seen.

Photo courtesy of Do You Mind If I Knit.
I'm going to make a definite goal for this summer...this girl is learning to crochet!

–Cassandra

Friday Finds: Photography Tutorial

Hi friends!

If you're anything like me, technical tips about how to take good photos of your crafts are always welcome. There are a lot of photography tutorials out there, but when I recently ran across this one by Eskimimi Makes I was impressed by it's simplicity and practicality.

Photo courtesy of Eskimimi Makes.
Take a peek when you get a chance.

Cassandra

Applique Blocks - Episode 2

Last week I left you hanging after applying the first piece of your artwork to your backing fabric. Today, I am going to show you how it works when you start layering pieces of your design on top of one another to build your images.

So, after you have sewn the first piece of your design onto the backing fabric, removed the paper template, and pressed it out nicely at the ironing board, it is time to add another piece.


In my project, it is the beginnings of a ship.


I broke my ship drawing up into 3 pieces. This way I can create depth with lighter and darker fabrics along with some hand embroidery to be added when all the pieces have been machine sewn to this block.


I created the next piece in the same manner shown in Episode 1, placed it where I wanted it, and stitched.


Turning the block over to the backside, I cut away the backing fabric and the hill fabric from behind the boat piece (leaving at least a 1/4" seam allowance), ripped out the paper template, flipped back to right side and pressed.

 
Continue building your images piece-by-piece. If you are like me, after your pieces are all added, you will hand-embroider over your machine stitching for a finished look. (This is why I chose to straight stitch the pieces on.) But that is by no means the most popular way. Most folks will use a zigzag or satin stitch on their machine when sewing on their applique pieces. This creates a nice finished edge and makes it unnecessary to go over it again.

When I'm building a more free-form block like this, I am constantly "mocking up" the block with paper pieces and fabric as I go. Like this:


This is how I realized that my trees need to be thin and sparse and the ship's steering wheel was going to take quite a combination of fabric and embroidery. Those thin pieces don't really work so well with the technique we just went through. But, don't worry...there is a different way.

Lemme talk to ya about something called "fusible web". Yet another technique to create an applique block. Fusible web comes in sheets or on a roll and basically it is paper-backed fabric glue that you can iron on. The process works similarly to the one above.

Iron a freezer paper template on to your fabric:


Cut a piece of the fusible web just a little larger than the size of the template. Flip your fabric over and put the web face down on your fabric and press. (Making sure glue side is in contact with your fabric and paper side in contact with the iron.)


Cut out your template without any seam allowance, peel the paper backing off the fabric, position it on the quilt block and press. At this point you can machine stitch the piece on with a decorative stitch or hand embroider. The edges won't fray on this piece because of the glue. Awesome huh?

Ready to be stitched!
There are many ways to assemble applique quilt blocks, this is just what has been working for me. I would love to hear tips, tricks, products, and techniques that you all love!

–Cassandra

Applique Blocks- Episode 1

For me, ideas start with a small sketch.


Then, it's time to figure out how to turn the idea into reality. And next thing you know, I am learning how to make an applique quilt block. And sharing it with you...

There are many different types of applique quilt blocks. Just do a Google image search for them and you will see beautiful floral motifs, cute animals, and, as always, some odd stuff that makes you remember that there are all kinds of tastes out there. What they all have in common is this, layers over layers of shaped pieces of fabric.

What do I mean by that? To put it simply, when you have a design in front of you, take note of what graphic elements are on top of one another. Take a look at the detail of this sketch below. If I wanted to create this in fabric, I have to start with what element is in the back of the drawing. In this case, that would be the hill on the horizon. (Look for the light, horizontal line behind the trees.)


From there I build up my image. Tree trunks, then greenery, then boat parts, etc. You can sketch it out and work in free-form like I am here, or you can get yourself a pattern and work more traditionally. Either way, the process of constructing the applique is the same.

I find it easier to work on applique blocks if I give myself some room beyond the finished size. (Partly because I am prone to adding embroidery elements on the block and I need some extra fabric around the edges so I can use a hoop.) I cut a piece of backing fabric larger than I need and I use a water-soluable marker and mark off the "live area" on my block (what will show on the quilt front) and the seam allowances. Like so:


Depending on your pattern, your backing fabric may be a design element or not. Pay attention to that when choosing your fabrics.

Once you have your backing fabric ready, and have decided what order the pieces need to be layered to create your image, and have shopped for the most gorgeous fabrics you can find...you need to run to the grocery store and buy yourself something called Freezer Paper.

This magical stuff has one side that is like white deli paper and the other side is some sort of waxy plastic. This is what you will use to create the shaped pieces that make up your design. You can draw your image on the paper side, cut it out, and then iron the waxy side on to your fabric...and it sticks and removes without a film. Told you it was magic.

I drew on the paper and cut out the shape of the hills in the background of my sketch (You may have noticed that the finished block is a different shape than the original sketch. That is how I roll.) and ironed the waxy side onto a piece of fabric. Please note: it is more effective to "press" your iron in a stamping motion when you want the freezer paper to stick to the fabric. Running it across like you were ironing a shirt will just make the paper curl.


Using the attached paper as my guide, I cut out my hill in the fabric, leaving about a quarter inch seam allowance around the edges. Then I peeled off the freezer paper.


Turning my piece of fabric wrong-side up, I placed the same cut piece of paper I just peeled off (this time waxy-side up) on top of the fabric (making sure the seam allowances are even) and started pressing the seam allowance over onto the waxy paper.


It is important to clip seams as you go so that your design looks smooth.


Then, I placed the hills piece on my backing piece, and pressed the two together. It only stuck so well so I pinned too.


Then I stitched the two together leaving about 1/8" seam allowance.


When edges were stitched together, I took the block over to the cutting table and flipped it over. It was time to remove the paper trapped inside. I carefully cut away the backing fabric (leaving about a 1/4" seam allowance) from behind the hills applique.


Then, I grabbed hold of the paper and tugged it loose:

This green piece anchors the bottom of the design, so I did not stitch the bottom edge because it gets caught in the seam allowance. Otherwise, I would have.

Flipping the block back over, I pressed it out and began preparations for adding the next piece. Which, I will tell you about next week... :)

–Cassandra

PS - Click here for Episode 2!


Making Your Own Hand Lotion Bars

Guess what I did? I made my own solid hand lotion. It was something that I've wanted to try for a while (and actually had the supplies sitting there waiting) but I kept putting off. I thought it was somehow going to be complicated or take forever.

Au contraire mon frere. It was simple and quick. (I think start to finish was under 30 minutes.) And the results yielded the best hand lotion I have ever used. It was even superior to similar natural ones I purchased.

Pretty little pots of awesome.

There are many, many tutorials out there and I'm pretty sure I looked at most of them in my research. In the end, the recipe I decided to try was this:

4 oz shea butter
4 oz beeswax (I used pellets)
4 oz avocado oil
essential oils for scent (I used a lovely blend from Lucky Mojo)

To get started, you need a double-boiler setup. You can purchase a proper double-boiler but I used a metal mixing bowl over one of my saucepans and it worked great. You just have to make sure you have the proper heat-resistant tools to lift the bowl off the saucepan easily when you need to take your concoction off the heat. Practice taking the bowl on and off the pan steadily before you heat anything up. The last thing you want to do is spill the hot lotion. It will result in a trip to the emergency room for burn treatment or a kitchen counter that will forever seem waxy and smell like rose geranium.

Another thing I need to mention is that once you heat up this concoction in a pan, bowl, or whatever...it is now contaminated. Don't use it for food anymore. My metal mixing bowl is now marked "lotion only".

The next thing you need are containers to pour your hot lotion mixture into. If you have soap molds you can make lotion bars. Once cooled, you just pop out the lotion bar and rub it on your hands like you would a bar of soap. These are so fun and if you can find a cute container to fit them would make great holiday presents. I chose to use 4oz glass canning jars. I have to sort of "scrape" the lotion out of them...but it's not big deal. I sort of have a thing for little glass jars with something gorgeous inside. It's my hang-up, most people would probably prefer a bar. Whatever you use should be heat-resistant though.

Now get started....

On a counter a few feet away from your stove, put down some newspaper and lay out your jars, molds, etc. ready to be filled with the hot lotion. (I used about 6 jars for the recipe above.)

Then, get water simmering in a pan. Make sure that when you put your second pan or bowl atop the pan with water that the water is not high enough to touch the bowl/pan above. Here is a great tutorial on double-boilers.

In your top bowl/pan, put the shea butter and the beeswax. Once the water is simmering, put this bowl/pan on the simmering water pan and stir constantly. Because you won't ever want to use this utensil again for food, I found that a disposable wooden chopstick worked awesome for stirring.

You will only stir for a few minutes before this mixture is completely liquified. Once this happens, pour in the avocado oil and keep stirring. As soon as it looks mixed and right, take this off the heat and pour into your molds/jars. You do not want to overheat the mixture or your ingredients can start getting weird on you. But don't worry, it's obvious when it's time to get off the heat. The oils will be completely liquid and a light golden color. 

Now is when it's handy to have a friend helping you. This mixture begins to cool quickly, so as one of the molds/jars gets poured, someone needs to follow behind and add the scent oils in and stir in well (but fast) with a toothpick. You don't want to heat essential oils so they get added at the last. As far as how much essential oil to add is up to your preference. I was generous with mine and have no regrets.

I let my lotion cool for about 10 hours before I deemed it ready for use.

Some recipes call for alternate ingredients like coco butter or jojoba oil, but this recipe felt right to me. What I might add next time is some vitamin E. (You can buy it as oil or just squeeze the contents of capsules right in with your essential oils.) This is supposed to act as a preservative from what I understand. You can order all the materials you need online or if you are as fortunate as me, buy them at a local natural pharmacy.

Sorry there are not more photos here but I was making these on my own and needed both hands. :)  But please take my word for it, these are simple and fun to make. This is the best lotion for crafters whose hands take a lot of abuse.

–Cassandra