Hi folks!
Have you noticed our new look? I'm pretty excited about it! It was time for something new.
When we started this blog a few years ago, our intentions were really vague. So, without the constraint of rules, we spent some time finding ourselves. We've experimented with graphics, formats, layouts, content, etc. After all this time, I think we've suddenly found our groove. Of course there are more changes to come, but we like this start.
Alex and I really enjoy writing (knitting/quilting/sewing) patterns. And from our download stats, many of you enjoy using them! We've decided that this is an area where we are going to devote the bulk of our time (don't worry...we're still distractible). So keep watching...there is more to come!
For now, visit the tabs above to access our current selection of patterns (all free!). They are organized by craft type so it's easy to find what interests you. We also have a presence on both Ravelry and Craftsy if you would like to download our patterns from there.
Speaking of new patterns, we will have two yummy knitting patterns featured in the upcoming book DeFarge Knits Shakespeare. We will let you know when the book release date is set.
–Cassandra
PS - I forgot to mention that our Log Cabin Quilt Block was named one of the top 6 most popular designs featured on FaveQuilts last year! Check out the story here.

Showing posts with label log cabin block. Show all posts
Showing posts with label log cabin block. Show all posts


The Man in the Wilderness Quilt Pt. 1
In the spring of 2012 I had this crazy idea. Driving through the country on my way home from work, through a misty rain I saw the brown and ochre landscape slowly giving way to the new bright green buds of the season. It was breathtaking. I knew I wanted to capture this color impression in a quilt.

And then, on top of that idea, I had been listening to the Natalie Merchant album, Leave Your Sleep. On one of the tracks, Natalie puts music to the Mother Goose poem, The Man in the Wilderness. I loved that poem as a child and Natalie does it more than justice with her musical arrangement. Those colors and that poem were a match made in heaven for me. So I began my design.
Putting my graphic design skills to work, I laid out an arrangement of different sized blocks to fit within the constraints of the queen sized quilt I wanted to make (76" x 90"). I had no idea what was going to go inside those different blocks so I had to research beginner type quilt blocks that would fit in each space. I also specified six big patches to use for embroidery/applique of the poem.
Now this quilt idea was crazy mostly because I had never really made a quilt and this quilt was going to be so big and include so many different kinds of blocks. As I learned, I thought I would share my knowledge with you as my scrappy log cabin, pinwheel, staggered strips, applique, and propeller quilt block tutorials. I'm so happy about the popularity of these tutorials because my intention was to help beginners like myself tackle some basic quilt blocks with as few tears as possible.

I took my time (obviously by the finish date on this project) and really tried to do things right as I went along. There were some frustrations and self-doubt but surprisingly few regrets. I loved the process and have already started my next project.
I did make the choice to have my quilt professionally quilted by our good friend Stitchlilly. Best. Decision. Ever. I chose an overall stipple pattern except for the applique areas. Those I did by hand with 6 strands of embroidery floss and no set-in-stone pattern. I wanted it to be a little more free-form and playful.

My next post will highlight some of the small details of this quilt an hopefully some better photos. New discovery of mine: photographing something so large is not easy!
–Cassandra
PS-I will admit, for a moment, as I was sewing up the colorful scrappy blocks...there was some small panic. Was this going to be too colorful? Obnoxious even? But I pressed on with fingers crossed. Did it turn out to be too much? Hells yes. But I love it anyway!

And then, on top of that idea, I had been listening to the Natalie Merchant album, Leave Your Sleep. On one of the tracks, Natalie puts music to the Mother Goose poem, The Man in the Wilderness. I loved that poem as a child and Natalie does it more than justice with her musical arrangement. Those colors and that poem were a match made in heaven for me. So I began my design.
Putting my graphic design skills to work, I laid out an arrangement of different sized blocks to fit within the constraints of the queen sized quilt I wanted to make (76" x 90"). I had no idea what was going to go inside those different blocks so I had to research beginner type quilt blocks that would fit in each space. I also specified six big patches to use for embroidery/applique of the poem.
 |
| This is the quilt's baby picture. |
Now this quilt idea was crazy mostly because I had never really made a quilt and this quilt was going to be so big and include so many different kinds of blocks. As I learned, I thought I would share my knowledge with you as my scrappy log cabin, pinwheel, staggered strips, applique, and propeller quilt block tutorials. I'm so happy about the popularity of these tutorials because my intention was to help beginners like myself tackle some basic quilt blocks with as few tears as possible.

I did make the choice to have my quilt professionally quilted by our good friend Stitchlilly. Best. Decision. Ever. I chose an overall stipple pattern except for the applique areas. Those I did by hand with 6 strands of embroidery floss and no set-in-stone pattern. I wanted it to be a little more free-form and playful.

My next post will highlight some of the small details of this quilt an hopefully some better photos. New discovery of mine: photographing something so large is not easy!
–Cassandra
PS-I will admit, for a moment, as I was sewing up the colorful scrappy blocks...there was some small panic. Was this going to be too colorful? Obnoxious even? But I pressed on with fingers crossed. Did it turn out to be too much? Hells yes. But I love it anyway!
FaveQuilts Love (& Free eBook!)
I have some fun news to share with you today. Our Log Cabin Quilt Block Tutorial has been included in a new eBook published by FaveQuilts called Patterns for Quilting: 8 Free Block Patterns to Make a Quilt for Your Home!
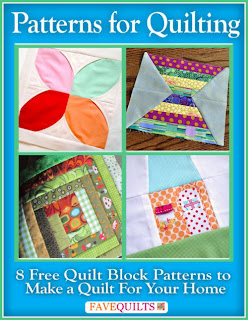
For those who don't know, Favequilts is a wonderful website that features free quilting content from around the web. You want to know how to sew an hourglass quilt block or maybe make your own bias tape? No problem. Go search their site and you'll find links to some great tutorials by other crafty bloggers like us.
Favequilts has featured quite a few of our tutorials on their site, the most popular being our Log Cabin Quilt Block. It lived on their "What's Hot" list for quite a while and recently we were asked for our permission for them to include it in their new eBook. Considering how many thousands of tutorials live on their site, we were really flattered.
You want to know the best art about this eBook for you? It's FREE. Yep, there's a lot of amazing content in there for nada. If you're a quilter, or want to be, go download your own copy today!
–Cassandra

For those who don't know, Favequilts is a wonderful website that features free quilting content from around the web. You want to know how to sew an hourglass quilt block or maybe make your own bias tape? No problem. Go search their site and you'll find links to some great tutorials by other crafty bloggers like us.
Favequilts has featured quite a few of our tutorials on their site, the most popular being our Log Cabin Quilt Block. It lived on their "What's Hot" list for quite a while and recently we were asked for our permission for them to include it in their new eBook. Considering how many thousands of tutorials live on their site, we were really flattered.
You want to know the best art about this eBook for you? It's FREE. Yep, there's a lot of amazing content in there for nada. If you're a quilter, or want to be, go download your own copy today!
–Cassandra
Log Cabin Block
I LOVE log cabin blocks. I do! I do! I do! I especially love them when they are made from random colors and patterns that all seem to magically flow together. I am not as much of a fan of the more traditional arrangement of two light and dark fabrics like you see here. Those blocks create a larger pattern that I can appreciate, but this is more my bag:
Log cabin blocks are considered "easy" in the world of quilting. In all the books I've looked at, they are always included in the beginner projects. Well, this beginner got confused...twice. Let's just say I will have two potholders in my kitchen that will match my sons quilt. Go me!
The thing that tripped me up was the order in which you assemble the pieces. I got cocky and didn't think I needed a cheat sheet. Yeah, I was wrong. I made a cheat sheet and now all is well. Eventually I didn't need to refer to it so much, but it is great when you get started.
Here is the recipe I used to make a random-colored block, hopefully I can inspire some of you to make some too:
Fabric
Quilter's cotton is recommended, but you can also use corduroy, linen, flannel, etc. The letters before the measurements show where that piece appears on the illustrations below.
A: one 2-1/2” square
B: one 1-1/2” x 2-1/2” strip
C & D: 1-1/2” x 3-1/2” strips of 2 different fabrics
E & F: 1-1/2” x 4-1/2” strips of 2 different fabrics
G & H: 1-1/2” x 5-1/2” strips of 2 different fabrics
I & J: 1-1/2” x 6-1/2” strips of 2 different fabrics
K & L: 1-1/2” x 7-1/2” strips of 2 different fabrics
M & N: 1-1/2” x 8-1/2” strips of 2 different fabrics
O & P: 1-1/2” x 9-1/2” strips of 2 different fabrics
Q & R: 1-1/2” x 10-1/2” strips of 2 different fabrics
S & T: 1-1/2” x 11-1/2” strips of 2 different fabrics
U: one 1-1/2” x 12-1/2” strip
Note: I used about 12 different patterned fabrics in my blocks which means I had to repeat them in the block. The trick is carefully repeating fabrics far apart from one another, plus never using a single fabric more than twice per block. Above photo of block shows an an example of how to repeat and still maintain "randomness".
Another Note: You will need to have a hot iron on standby at all times. After you sew every seam, you need to press your seams either open or both to one direction to avoid bulkiness. I personally prefer to press them all to face the outer edges of the block.
Begin by sewing your 2-1/2" square and 1-1/2” x 2-1/2” strip together with a straight stitch and a 1/4" seam allowance (use this seam allowance throughout the block). You will have something that looks like this:

You will always want to add your strips in a clockwise fashion. Therefore, strip C will be added to the right:

And D will then follow suit of going around the center square block, being added to the bottom:

Logically, E gets pieced on the left and you have a square block again:

Then it all starts again at the top with F:

Continue in this clockwise pattern until you have used all your strips and your piece should look like this:

Repeated, this block alone could make an adorable quilt. Used singularly it could be a great pillow front, potholder (ahem), feature on a tote bag or some such. As excited as I am to start work on the other blocks in my grand quilt design, I will miss making my log cabins.
–Cassandra
P.S. For more quilting tutorials,please check out our staggered strips block tutorial and easy pinwheel block tutorial.
 |
| My 12x12 log cabin blocks waiting to find their place in the quilt. |
Log cabin blocks are considered "easy" in the world of quilting. In all the books I've looked at, they are always included in the beginner projects. Well, this beginner got confused...twice. Let's just say I will have two potholders in my kitchen that will match my sons quilt. Go me!
 |
| Piecing my block with a 1/4" seam allowance. |
The thing that tripped me up was the order in which you assemble the pieces. I got cocky and didn't think I needed a cheat sheet. Yeah, I was wrong. I made a cheat sheet and now all is well. Eventually I didn't need to refer to it so much, but it is great when you get started.
 |
| Keep in mind...this is the direction you want to keep adding blocks. |
Here is the recipe I used to make a random-colored block, hopefully I can inspire some of you to make some too:
Fabric
Quilter's cotton is recommended, but you can also use corduroy, linen, flannel, etc. The letters before the measurements show where that piece appears on the illustrations below.
A: one 2-1/2” square
B: one 1-1/2” x 2-1/2” strip
C & D: 1-1/2” x 3-1/2” strips of 2 different fabrics
E & F: 1-1/2” x 4-1/2” strips of 2 different fabrics
G & H: 1-1/2” x 5-1/2” strips of 2 different fabrics
I & J: 1-1/2” x 6-1/2” strips of 2 different fabrics
K & L: 1-1/2” x 7-1/2” strips of 2 different fabrics
M & N: 1-1/2” x 8-1/2” strips of 2 different fabrics
O & P: 1-1/2” x 9-1/2” strips of 2 different fabrics
Q & R: 1-1/2” x 10-1/2” strips of 2 different fabrics
S & T: 1-1/2” x 11-1/2” strips of 2 different fabrics
U: one 1-1/2” x 12-1/2” strip
Note: I used about 12 different patterned fabrics in my blocks which means I had to repeat them in the block. The trick is carefully repeating fabrics far apart from one another, plus never using a single fabric more than twice per block. Above photo of block shows an an example of how to repeat and still maintain "randomness".
Another Note: You will need to have a hot iron on standby at all times. After you sew every seam, you need to press your seams either open or both to one direction to avoid bulkiness. I personally prefer to press them all to face the outer edges of the block.
Begin by sewing your 2-1/2" square and 1-1/2” x 2-1/2” strip together with a straight stitch and a 1/4" seam allowance (use this seam allowance throughout the block). You will have something that looks like this:
You will always want to add your strips in a clockwise fashion. Therefore, strip C will be added to the right:
And D will then follow suit of going around the center square block, being added to the bottom:
Logically, E gets pieced on the left and you have a square block again:
Then it all starts again at the top with F:
Continue in this clockwise pattern until you have used all your strips and your piece should look like this:

Repeated, this block alone could make an adorable quilt. Used singularly it could be a great pillow front, potholder (ahem), feature on a tote bag or some such. As excited as I am to start work on the other blocks in my grand quilt design, I will miss making my log cabins.
–Cassandra
P.S. For more quilting tutorials,please check out our staggered strips block tutorial and easy pinwheel block tutorial.
Subscribe to:
Posts (Atom)