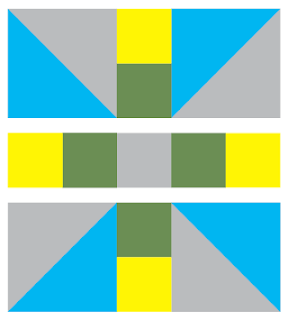
Today we have another tutorial for a classic quilt block design called the Propeller Quilt Block. This one uses techniques learned from the super-simple Pinwheel Quilt Block and adds a few more elements to make a very versatile 10" block.
What I love about this block is that the fabric color choices you make can alter the visual effect of this block radically. Check out these color options and see how these blocks make completely different patterns when repeated in groups of 4:
And now, if you want to try this for yourself....
These are the pieces that come together to make this 10" block:
Let's begin by making 4 of these:
Cut two 4-7/8" squares of each fabric color. Laying those two fabrics right sides together draw a diagonal line with a water soluable marker across one point to another. Then stitch a 1/4" seam on either side of the line as illustrated here:
Sometimes sewing on the bias (across the grain of the fabric) can be tricky on pieces like this. I have some tips on my Pinwheel Block tutorial that can help keep those seams neat. After stitching, cut apart along the marker line and press seam allowance toward darker fabric. Make sure your block is 4.5" square, nipping off the little "dog ears" where the fabrics come together.
Next, we will make 4 of these:
Begin by making strips of 2 fabrics 2-1/2" wide and at least 10-1/2" long. Sew those strips along the long edge with a 1/4" seam allowance. Press the seam open toward the darker fabric and place on your cutting mat. You will now have a big piece that measures 4-1/2" x 10-1/2".
Using your rotary cutter and straight edge, cut four, 2-1/2" wide strips off of the 2-color piece you just made.
Now, cut one 2-1/2" square out of the fabric from one of the diagonal pieces you made above for the center of the block.
All the pieces are now ready to be put together to create your block! So now what you need to do is lay your block out in just the way you want it to appear.
You are now ready to start sewing the sections together. Using a 1/4" seam allowance, stitch together each row on the top 3, middle 3, and bottom 3 sections of the block together like this:
Press all seams to the side. You have 3 pieces left. These all are now stitched together with a 1/4" seam allowance to finish the block.
Helpful tip: As I was sewing this block together, I found that pinning the blocks on the seams exactly where I wanted them to line up was critical for my seams to meet where they should.
This block is just one of many designs in a quilt I have in progress. But the more I look at the versatility of this design I get inspired to make a quilt entirely of these blocks. It could be scrappy and fun or super modern-chic!
–Cassandra
PS - See some of our other tutorials for more quilty fun: Staggered Strips Block, Scrappy Log Cabin Block, and Pinwheel Quilt Block.


Love it! Pinwheels..and HSTs are my favorites! You get both in this block! My problem would be sorting out what color combos to go with.
ReplyDeleteHave a great day!
Angela
I know, that's the problem isn't it? To me the fabric color choices are always the most challenging too! Glad you like this one :)
Delete–Cassandra
I've been looking for a fun, scrappy type pattern to whip together for a wall hanging for my new grandbaby. Think this one will adapt perfectly and be great fun to do. Thank you so much for sharing!
ReplyDeleteYeah! That sounds so fun! I'd love to see your finished quilt! Pop us an email if you can!
DeleteI think you have a typo--"Begin by making strips of fabric 2 1/5" wide..." Don't you mean 2 1/2" wide?
ReplyDeleteOh yes! You are correct...the typo has now been fixed. Thanks so so much! :)
DeleteThis will be my second go at quilting, it looks like a fun project, I'm going to be doing it for my grandson Isaac. Thank you for a lovely easy to follow pattern x
ReplyDeleteYeah! That will make a great baby quilt. Email us a picture when you're finished!
Delete-Cassandra