Showing posts with label applique quilt block. Show all posts

The Man in the Wilderness Quilt Pt. 1

In the spring of 2012 I had this crazy idea. Driving through the country on my way home from work, through a misty rain I saw the brown and ochre landscape slowly giving way to the new bright green buds of the season. It was breathtaking. I knew I wanted to capture this color impression in a quilt.


 And then, on top of that idea, I had been listening to the Natalie Merchant album, Leave Your Sleep. On one of the tracks, Natalie puts music to the Mother Goose poem, The Man in the Wilderness. I loved that poem as a child and Natalie does it more than justice with her musical arrangement. Those colors and that poem were a match made in heaven for me. So I began my design.


Putting my graphic design skills to work, I laid out an arrangement of different sized blocks to fit within the constraints of the queen sized quilt I wanted to make (76" x 90"). I had no idea what was going to go inside those different blocks so I had to research beginner type quilt blocks that would fit in each space. I also specified six big patches to use for embroidery/applique of the poem.

This is the quilt's baby picture.

Now this quilt idea was crazy mostly because I had never really made a quilt and this quilt was going to be so big and include so many different kinds of blocks. As I learned, I thought I would share my knowledge with you as my scrappy log cabin, pinwheel, staggered strips, applique, and propeller quilt block tutorials. I'm so happy about the popularity of these tutorials because my intention was to help beginners like myself tackle some basic quilt blocks with as few tears as possible.


I took my time (obviously by the finish date on this project) and really tried to do things right as I went along. There were some frustrations and self-doubt but surprisingly few regrets. I loved the process and have already started my next project.

I did make the choice to have my quilt professionally quilted by our good friend Stitchlilly. Best. Decision. Ever. I chose an overall stipple pattern except for the applique areas. Those I did by hand with 6 strands of embroidery floss and no set-in-stone pattern. I wanted it to be a little more free-form and playful.


My next post will highlight some of the small details of this quilt an hopefully some better photos. New discovery of mine: photographing something so large is not easy!

–Cassandra

PS-I will admit, for a moment, as I was sewing up the colorful scrappy blocks...there was some small panic. Was this going to be too colorful? Obnoxious even? But I pressed on with fingers crossed. Did it turn out to be too much? Hells yes. But I love it anyway!

Applique Blocks - Episode 2

Last week I left you hanging after applying the first piece of your artwork to your backing fabric. Today, I am going to show you how it works when you start layering pieces of your design on top of one another to build your images.

So, after you have sewn the first piece of your design onto the backing fabric, removed the paper template, and pressed it out nicely at the ironing board, it is time to add another piece.


In my project, it is the beginnings of a ship.


I broke my ship drawing up into 3 pieces. This way I can create depth with lighter and darker fabrics along with some hand embroidery to be added when all the pieces have been machine sewn to this block.


I created the next piece in the same manner shown in Episode 1, placed it where I wanted it, and stitched.


Turning the block over to the backside, I cut away the backing fabric and the hill fabric from behind the boat piece (leaving at least a 1/4" seam allowance), ripped out the paper template, flipped back to right side and pressed.

 
Continue building your images piece-by-piece. If you are like me, after your pieces are all added, you will hand-embroider over your machine stitching for a finished look. (This is why I chose to straight stitch the pieces on.) But that is by no means the most popular way. Most folks will use a zigzag or satin stitch on their machine when sewing on their applique pieces. This creates a nice finished edge and makes it unnecessary to go over it again.

When I'm building a more free-form block like this, I am constantly "mocking up" the block with paper pieces and fabric as I go. Like this:


This is how I realized that my trees need to be thin and sparse and the ship's steering wheel was going to take quite a combination of fabric and embroidery. Those thin pieces don't really work so well with the technique we just went through. But, don't worry...there is a different way.

Lemme talk to ya about something called "fusible web". Yet another technique to create an applique block. Fusible web comes in sheets or on a roll and basically it is paper-backed fabric glue that you can iron on. The process works similarly to the one above.

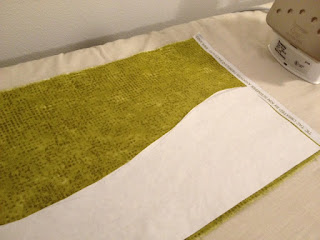
Iron a freezer paper template on to your fabric:


Cut a piece of the fusible web just a little larger than the size of the template. Flip your fabric over and put the web face down on your fabric and press. (Making sure glue side is in contact with your fabric and paper side in contact with the iron.)


Cut out your template without any seam allowance, peel the paper backing off the fabric, position it on the quilt block and press. At this point you can machine stitch the piece on with a decorative stitch or hand embroider. The edges won't fray on this piece because of the glue. Awesome huh?

Ready to be stitched!
There are many ways to assemble applique quilt blocks, this is just what has been working for me. I would love to hear tips, tricks, products, and techniques that you all love!

–Cassandra

Applique Blocks- Episode 1

For me, ideas start with a small sketch.


Then, it's time to figure out how to turn the idea into reality. And next thing you know, I am learning how to make an applique quilt block. And sharing it with you...

There are many different types of applique quilt blocks. Just do a Google image search for them and you will see beautiful floral motifs, cute animals, and, as always, some odd stuff that makes you remember that there are all kinds of tastes out there. What they all have in common is this, layers over layers of shaped pieces of fabric.

What do I mean by that? To put it simply, when you have a design in front of you, take note of what graphic elements are on top of one another. Take a look at the detail of this sketch below. If I wanted to create this in fabric, I have to start with what element is in the back of the drawing. In this case, that would be the hill on the horizon. (Look for the light, horizontal line behind the trees.)


From there I build up my image. Tree trunks, then greenery, then boat parts, etc. You can sketch it out and work in free-form like I am here, or you can get yourself a pattern and work more traditionally. Either way, the process of constructing the applique is the same.

I find it easier to work on applique blocks if I give myself some room beyond the finished size. (Partly because I am prone to adding embroidery elements on the block and I need some extra fabric around the edges so I can use a hoop.) I cut a piece of backing fabric larger than I need and I use a water-soluable marker and mark off the "live area" on my block (what will show on the quilt front) and the seam allowances. Like so:


Depending on your pattern, your backing fabric may be a design element or not. Pay attention to that when choosing your fabrics.

Once you have your backing fabric ready, and have decided what order the pieces need to be layered to create your image, and have shopped for the most gorgeous fabrics you can find...you need to run to the grocery store and buy yourself something called Freezer Paper.

This magical stuff has one side that is like white deli paper and the other side is some sort of waxy plastic. This is what you will use to create the shaped pieces that make up your design. You can draw your image on the paper side, cut it out, and then iron the waxy side on to your fabric...and it sticks and removes without a film. Told you it was magic.

I drew on the paper and cut out the shape of the hills in the background of my sketch (You may have noticed that the finished block is a different shape than the original sketch. That is how I roll.) and ironed the waxy side onto a piece of fabric. Please note: it is more effective to "press" your iron in a stamping motion when you want the freezer paper to stick to the fabric. Running it across like you were ironing a shirt will just make the paper curl.


Using the attached paper as my guide, I cut out my hill in the fabric, leaving about a quarter inch seam allowance around the edges. Then I peeled off the freezer paper.


Turning my piece of fabric wrong-side up, I placed the same cut piece of paper I just peeled off (this time waxy-side up) on top of the fabric (making sure the seam allowances are even) and started pressing the seam allowance over onto the waxy paper.


It is important to clip seams as you go so that your design looks smooth.


Then, I placed the hills piece on my backing piece, and pressed the two together. It only stuck so well so I pinned too.


Then I stitched the two together leaving about 1/8" seam allowance.


When edges were stitched together, I took the block over to the cutting table and flipped it over. It was time to remove the paper trapped inside. I carefully cut away the backing fabric (leaving about a 1/4" seam allowance) from behind the hills applique.


Then, I grabbed hold of the paper and tugged it loose:

This green piece anchors the bottom of the design, so I did not stitch the bottom edge because it gets caught in the seam allowance. Otherwise, I would have.

Flipping the block back over, I pressed it out and began preparations for adding the next piece. Which, I will tell you about next week... :)

–Cassandra

PS - Click here for Episode 2!