Friday Finds: Homesteading & Survivalism


I'm pretty sure I've talked to you all about my love of Doomsday Preppers, the reality show on the National Geographic Channel. The program follows folks who are preparring for some version of Armageddon - world financial collapse, electromagnetic pulses, a new ice age, etc. The reason I love the show is not because these people are, by most standards, a little nutty but because they are the most amazing, maniacal crafters.

From canning to building bomb-proof shelters, these people do it all. They are fully prepared to live off the land (or their stores of stuff) should civilation-as-we-know-it collapse. I'm impressed and jealous all at the same time. Frankly, I want a giant storage shed full of canned food. And a bomb-shelter made out of an old shipping container. And a cool way to filter brown water to irrigate my plants.

Maybe I need to start believing that the end of the world is coming. That might be the motivation I need.

In the meantime, I found this awesome resource for all things "survival" - Homesteading and Survivalism.


Sadly, their regular website is just a store - although they have some great pamphlets and books on how to do various crafty things. The store is here: http://homesteadingsurvivalism.myshopify.com/

I love this idea!!
Their best content is what they put on their Facebook page. They cull the internet for all manner of awesome craftiness like "50 ways to use baking soda" and "how to build a pallett cooler". I'm not even scratching the surface of the cool ideas you'll get if you "like" their page. (Sorry to feature another FB resource... but it really is great.) Find their FB page here:

And, of course, you can follow them on my preferred social media, Twitter: www.twitter.com/homestdsurvival

I hope you get lots of amazing, crafty ideas!

- Alex

Applique Blocks- Episode 1

For me, ideas start with a small sketch.


Then, it's time to figure out how to turn the idea into reality. And next thing you know, I am learning how to make an applique quilt block. And sharing it with you...

There are many different types of applique quilt blocks. Just do a Google image search for them and you will see beautiful floral motifs, cute animals, and, as always, some odd stuff that makes you remember that there are all kinds of tastes out there. What they all have in common is this, layers over layers of shaped pieces of fabric.

What do I mean by that? To put it simply, when you have a design in front of you, take note of what graphic elements are on top of one another. Take a look at the detail of this sketch below. If I wanted to create this in fabric, I have to start with what element is in the back of the drawing. In this case, that would be the hill on the horizon. (Look for the light, horizontal line behind the trees.)


From there I build up my image. Tree trunks, then greenery, then boat parts, etc. You can sketch it out and work in free-form like I am here, or you can get yourself a pattern and work more traditionally. Either way, the process of constructing the applique is the same.

I find it easier to work on applique blocks if I give myself some room beyond the finished size. (Partly because I am prone to adding embroidery elements on the block and I need some extra fabric around the edges so I can use a hoop.) I cut a piece of backing fabric larger than I need and I use a water-soluable marker and mark off the "live area" on my block (what will show on the quilt front) and the seam allowances. Like so:


Depending on your pattern, your backing fabric may be a design element or not. Pay attention to that when choosing your fabrics.

Once you have your backing fabric ready, and have decided what order the pieces need to be layered to create your image, and have shopped for the most gorgeous fabrics you can find...you need to run to the grocery store and buy yourself something called Freezer Paper.

This magical stuff has one side that is like white deli paper and the other side is some sort of waxy plastic. This is what you will use to create the shaped pieces that make up your design. You can draw your image on the paper side, cut it out, and then iron the waxy side on to your fabric...and it sticks and removes without a film. Told you it was magic.

I drew on the paper and cut out the shape of the hills in the background of my sketch (You may have noticed that the finished block is a different shape than the original sketch. That is how I roll.) and ironed the waxy side onto a piece of fabric. Please note: it is more effective to "press" your iron in a stamping motion when you want the freezer paper to stick to the fabric. Running it across like you were ironing a shirt will just make the paper curl.


Using the attached paper as my guide, I cut out my hill in the fabric, leaving about a quarter inch seam allowance around the edges. Then I peeled off the freezer paper.


Turning my piece of fabric wrong-side up, I placed the same cut piece of paper I just peeled off (this time waxy-side up) on top of the fabric (making sure the seam allowances are even) and started pressing the seam allowance over onto the waxy paper.


It is important to clip seams as you go so that your design looks smooth.


Then, I placed the hills piece on my backing piece, and pressed the two together. It only stuck so well so I pinned too.


Then I stitched the two together leaving about 1/8" seam allowance.


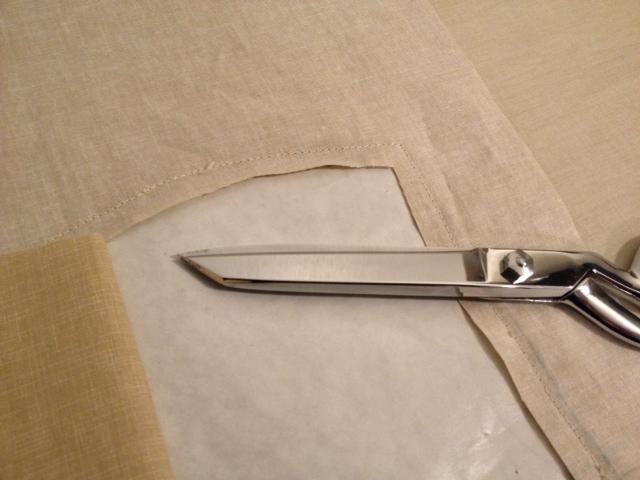
When edges were stitched together, I took the block over to the cutting table and flipped it over. It was time to remove the paper trapped inside. I carefully cut away the backing fabric (leaving about a 1/4" seam allowance) from behind the hills applique.


Then, I grabbed hold of the paper and tugged it loose:

This green piece anchors the bottom of the design, so I did not stitch the bottom edge because it gets caught in the seam allowance. Otherwise, I would have.

Flipping the block back over, I pressed it out and began preparations for adding the next piece. Which, I will tell you about next week... :)

–Cassandra

PS - Click here for Episode 2!


Ten Chimneys

Alfred Lunt and Lynn Fontanne in the library

This past Saturday I had the honor of touring Ten Chimneys - the longtime home and retreat of Broadway legends Alfred Lunt and Lynn Fontanne tucked away in the remote town of Genessee Depot, Wisconsin. This amazing property is richer in theater history and riveting stories than it is in architectural and interior design (which it has in spades). So much so, in fact, that I am at a loss as to how to begin.

Do I start with the story of Alfred and Lynn and talk of their enduring (and endearing) relationship? Do I tell you about their rise to fame and how this incredible estate came into existence and evolved throughout their lifetime? Or maybe the real story is the one peppered with the names of huge celebrities of stage and screen from the 1930s through the 1970s who would commune at Ten Chimneys for glittering conversation and inspiring creativity.

Ten Chimneys Main House

Each of these is a story worthy of its own telling and doesn't deserve to be glossed over.

So... as much as I want to write a short novel about all the amazing things I saw and learned, I'm going to keep it appropriate to our blog and talk about the fact that Alfred and Lynn - with all their riches and fame - were makers just like us.

As hard as it is to believe, these super-famous, exceedingly wealthy people loved to sew, cook, garden, and decorate their home.


Alfred studied at the Sorbonne in France and was, by all accounts, an amazing chef. It's said that Lynn would go to the fashion shows during New York fashion week and study the garments - then go home and sew versions of them for herself. The interior design - including nearly all the wall murals - in the Honeymoon Cottage (pictured below) was done by Alfred. Lynn sewed all the curtains, slipcovers, and most of the bedspreads in both houses. The property housed chickens (about 200 of them), pigs, a green house, a creamery, and a massive garden - all of which were tended by Alfred and Lynn, when they were present on the estate.

Alfred & Lynn in the cottage kitchen
The Honeymoon Cottage

Helen Hayes was a frequent guest at Ten Chimneys and her preferred bedroom has a bedspread, curtains, and a "headboard" that were designed and made by Lynn.


The "Helen Hayes" Bedroom
 As a matter of fact, Lynn made all the drapes in the house including the impressive examples in the rooms below:

The Dining Room
A bit of the Living Room
The Garden Terrace Room

Alfred was known to cook for the estate staff. The staff was invited to eat in the dining room but preferred the kitchen (I can't imagine why...). My only gift-store purchase was the Ten Chimneys Cookbook - a collection of Alfred's recipes.

Alfred serving the estate staff

Our docent, my dear friend John, was so full of great trivia and enthusiasm for the subject that our tour of 2+ hours flew by and I'm already planning my next trip to the property.

Best. Docent. Ever. xoxo

So, as much as I'd love to prattle on about the house and the Lunts, I'll just leave you with a few more photos and some bits of trivia. I hope that you'll take it upon yourself to learn more about Alfred and Lynn and, if you're ever in south east Wisconsin, that you'll take some time to visit Ten Chimneys.

- Alex


The most important piece of trivia is this: when Lynn passed away in 1983, the house was "closed up" and simply maintained to ensure that it didn't fall into disrepair. It remained that way until 1995 when it was purchased with the intent of preserving this perfect slice of history. Unlike most historic homes, this one remained intact - furniture, documents, toiletries, cleaning supplies, etc. - as if the residents had just stepped out for the afternoon. It is, perhaps, the purest representation of an historic home that exists.

The "Studio" was an outbuilding on the property where friends would gather to play, practice, and create. There's a rumor that they would occasionally lock a playwright in the studio and not let him out until he'd completed some piece that they could perform.


The Infamous Studio
The Lunts built the first in-ground pool in the state of Wisconsin, using only local labor. The dome on the bathhouse was a cistern. The sun would heat the water in the dome and guests could take a hot shower before heading back to the house.

The Bathhouse & first in-ground pool in Wisconsin
While the photo below doesn't do justice to the kitchen, it was well-used and well-loved with a set of sinks dedicated to food and a set of sinks dedicated to dishes. A dumbwaiter, which Alfred built himself, lifts packages from the lower level laundry room to the kitchen above.

The Kitchen (well, about 1/3 of it)

Sir Laurence Olivier was a frequent guest at Ten Chimneys and the photo below is of the room where he stayed during his visits. He's famously quoted as saying, "Everything I know about acting I learned from Alfred Lunt."

The Olivier Bedroom

The Lunts closest friend from their earliest days as emerging stage actors in London (and from before they were married) was Noël Coward. His photo can be found in nearly every private room of the house.

Alfred, Lynn, and Noël - BFFs


Friday Finds: Gratitude Trees

Today's find is more of and "idea". If you're anything like me, you are always looking for thoughtful ways to celebrate the seasons. That's why I was really excited when I ran across some ideas for a gratitude tree. A perfect post-Halloween and pre-Thanksgiving way to engage my family in a project that is both creative and positive.

Photo courtesy of Decor Chick!
The idea is to make a tree indoors, adding leaves with thoughts about things you are thankful for right now. For example, I might put up a leaf today that says "Getting to have lunch with Alex". How and when you put the leaves up can be personalized to fit your family dynamic. At our house, I think we might add a leaf for everyone in the family at dinnertime. We can all talk about what we are thankful for during our meal and then add our leaves to the tree after plates are cleared.

Photo courtesy of nannygoat.
Then, on Thanksgiving we can read through what we are grateful for. Lovely.

You can make the tree out of fallen branches from outside (I love the idea of having the kids actually gather them), paper, cloth, paper maché, etc. The leaves can be anything you can write on and attach. Whatever floats your boat. Pinterest is full of ideas. Just search "Thankfulness Tree".

So, now you know what I am up to this weekend!

–Cassandra

Happy Halloween From the Lamest House on the Block.


The culmination of Spookytober has arrived.

It's a cold and windy day in Madison, WI and I'm afraid that the little spooks will be required to wear jackets over their costumes tonight. It somehow wrecks the atmosphere when the ghosts and goblins are wrapped in fleece and gortex.

I was complaining to Cassandra the other day that I'm having, what can only be called, craft-block. For weeks I've felt uninspired and unable to create. The result of this is that:
  1. I haven't done any creative/craft work of consequence in ages
  2. My house didn't get decorated for Halloween
The second of these is, frankly, my biggest source of guilt right now.

While I don't decorate on the same scale as Cassandra, I am (usually) one of the most decorated houses on my block. I have an awesome graveyard and a nearly-lifesized skeleton that lives in it. There are ghosts in the windows and larger-than-life rats and bats living all around my front yard. Then, on Halloween night, I put on my vampire cape and pointy teeth and I sit outside with my black bowl full of candy - a gargoyle and skeleton candles on the table beside me.

For many years, my dogs dressed up and sat outside with me but, as often happens with toy dogs, they eventually became too barky and annoying to participate in the event. Now they're relegated to the house. They're really missing out...

Tonight I'll still sit outside because, frankly, having my doorbell ring every five minutes sends the dogs into fits of barking that builds on itself until they become completely crazed. Plus, I love seeing all the kids running around the neighborhood.

In the spirit of the day, I'd like to share a great creepy food idea with you. My friend Tami made these amazing "meat mice" for dinner the other night.


She modified the original recipe a lot - making hers with ground pork, vegetables and a lot of spice. And, she simply baked them in the oven instead of cooking them in tomato sauce. She also served them over roasted potatoes instead of spaghetti. So, basically, they're meatloaf shaped into mouse shapes. I love them.

Here's the original recipe from the Facebook page, "Better Gnomes & Cauldrons". Obviously, you can alter this considerably to your taste. In the end, you just want to be able to eat some mice.

Baked "rats"

1-1/2 lbs. lean ground beef
1/2 cup uncooked long grain white rice
1/2 medium onion, finely chopped
1 egg, beaten
1 teaspoon salt
uncooked spaghetti, broken into quarters
thinly sliced raw carrots
black peppercorns, cooked black beans

For the sauce, um, blood:

1 can (19 oz.) crushed or ground tomatoes
1-1/2 cups water
1 tablespoon sugar
1 tablespoon Worcestershire sauce
1 teaspoon salt
1/4 teaspoon black pepper

Cooking Instructions

In a mixing bowl, combine the ground beef, rice, onion, egg and 1 teaspoon of the salt. Mix well.

Now make the rats. Using a measuring cup, scoop out 1/4 cup of the ground beef mixture. Form it, by hand, into a firmly packed teardrop shape -- pointy on one end, rounded on the other. This is your basic rat. Place it into a 3-quart shallow baking dish and gently pinch in the neck area. Poke a piece of uncooked spaghetti into the larger rounded end as a tail. Repeat with the remaining ground beef mixture. When all the rats are neatly placed in the baking dish, stir together the tomatoes, water, sugar, Worcestershire sauce, remaining 1 teaspoon of salt and 1/4 teaspoon pepper. Pour over the rats. Bake at 350 degrees F for 40 minutes, basting occasionally with sauce. Then cover the dish with foil and bake for another 15 minutes, or until the rice is tender and the rats are fully cooked. Gently remove rats, one at a time, from the sauce and place gently on a serving platter. (Take care not to damage the tails -- they're fairly delicate.) Into each rat, insert two carrot slices as ears, peppercorns (or whatever) for eyes, and a few more broken strands of uncooked spaghetti for whiskers. Spoon sauce around the rats and serve, smiling wickedly.

–Alex

Making Your Own Hand Lotion Bars

Guess what I did? I made my own solid hand lotion. It was something that I've wanted to try for a while (and actually had the supplies sitting there waiting) but I kept putting off. I thought it was somehow going to be complicated or take forever.

Au contraire mon frere. It was simple and quick. (I think start to finish was under 30 minutes.) And the results yielded the best hand lotion I have ever used. It was even superior to similar natural ones I purchased.

Pretty little pots of awesome.

There are many, many tutorials out there and I'm pretty sure I looked at most of them in my research. In the end, the recipe I decided to try was this:

4 oz shea butter
4 oz beeswax (I used pellets)
4 oz avocado oil
essential oils for scent (I used a lovely blend from Lucky Mojo)

To get started, you need a double-boiler setup. You can purchase a proper double-boiler but I used a metal mixing bowl over one of my saucepans and it worked great. You just have to make sure you have the proper heat-resistant tools to lift the bowl off the saucepan easily when you need to take your concoction off the heat. Practice taking the bowl on and off the pan steadily before you heat anything up. The last thing you want to do is spill the hot lotion. It will result in a trip to the emergency room for burn treatment or a kitchen counter that will forever seem waxy and smell like rose geranium.

Another thing I need to mention is that once you heat up this concoction in a pan, bowl, or whatever...it is now contaminated. Don't use it for food anymore. My metal mixing bowl is now marked "lotion only".

The next thing you need are containers to pour your hot lotion mixture into. If you have soap molds you can make lotion bars. Once cooled, you just pop out the lotion bar and rub it on your hands like you would a bar of soap. These are so fun and if you can find a cute container to fit them would make great holiday presents. I chose to use 4oz glass canning jars. I have to sort of "scrape" the lotion out of them...but it's not big deal. I sort of have a thing for little glass jars with something gorgeous inside. It's my hang-up, most people would probably prefer a bar. Whatever you use should be heat-resistant though.

Now get started....

On a counter a few feet away from your stove, put down some newspaper and lay out your jars, molds, etc. ready to be filled with the hot lotion. (I used about 6 jars for the recipe above.)

Then, get water simmering in a pan. Make sure that when you put your second pan or bowl atop the pan with water that the water is not high enough to touch the bowl/pan above. Here is a great tutorial on double-boilers.

In your top bowl/pan, put the shea butter and the beeswax. Once the water is simmering, put this bowl/pan on the simmering water pan and stir constantly. Because you won't ever want to use this utensil again for food, I found that a disposable wooden chopstick worked awesome for stirring.

You will only stir for a few minutes before this mixture is completely liquified. Once this happens, pour in the avocado oil and keep stirring. As soon as it looks mixed and right, take this off the heat and pour into your molds/jars. You do not want to overheat the mixture or your ingredients can start getting weird on you. But don't worry, it's obvious when it's time to get off the heat. The oils will be completely liquid and a light golden color. 

Now is when it's handy to have a friend helping you. This mixture begins to cool quickly, so as one of the molds/jars gets poured, someone needs to follow behind and add the scent oils in and stir in well (but fast) with a toothpick. You don't want to heat essential oils so they get added at the last. As far as how much essential oil to add is up to your preference. I was generous with mine and have no regrets.

I let my lotion cool for about 10 hours before I deemed it ready for use.

Some recipes call for alternate ingredients like coco butter or jojoba oil, but this recipe felt right to me. What I might add next time is some vitamin E. (You can buy it as oil or just squeeze the contents of capsules right in with your essential oils.) This is supposed to act as a preservative from what I understand. You can order all the materials you need online or if you are as fortunate as me, buy them at a local natural pharmacy.

Sorry there are not more photos here but I was making these on my own and needed both hands. :)  But please take my word for it, these are simple and fun to make. This is the best lotion for crafters whose hands take a lot of abuse.

–Cassandra

The Rise of Fleece

Fleece used to really freak me out. I hated the way it felt - weirdly like plastic against my skin. Since I'm a natural fiber snob this aversion to fleece should come as no surprise to anyone.

Then I adopted my dogs. My dog LOVE fleece. I cannot emphasize this enough. LOVE. If given the option of a cotton, wool, or fleece blanket, the fleece will win every time. And, frankly, this is a good thing because it doesn't matter how disgustingly doggy their blankets get, the damn synthetic washes up clean. The worst thing that happens is that it pills. And, guess what... my dogs don't care.

We call this the "bed nest"

So, suddenly, I had fleece blankets in my house - first, just on the dog beds, then, eventually, new ones were bought for the sofa. And then one made it onto the bed.

Wisconsin winters are really cold and my 104 year old house is a drafty old gal. I came to welcome the fleece blankets and, somehow, my strange aversion to the "feel" of it disappeared. I like to think that it's because fleece evolved and the newer stuff was less "fake" feeling but, truthfully, it's probably just that I got used to it.

The final blow came a couple of years ago when Company X offered a variety of Land's End clothing items as holiday gifts to the staff. The only thing I thought I might actually wear was a 1/4 zip fleece pull-over. If nothing else, I could wear it around the house when it was cold. So, that's what I ordered. It was so soft and warm that I ordered a second one the following year in a different color. As a matter of fact, I'm wearing one right now!
It's kind of pill-y but, really, who cares?

So, why this diatribe on fleece, you ask? Well, recently, I've been crafting with fleece and I've come to appreciate one more thing - the ease of the stuff.

If you need a quickie project or want to do something with children that doesn't involve sewing, fleece is your go-to fabric. There are multitudes of prints and weights (the wall o' fleece at Joann's is a thing to behold) and it's cheap.

For our charity crafting day, we did a number of no-sew fleece blankets which we then stuffed with batting and turned into dog (or cat) beds for the Humane Society. No-sew blankets are beyond easy. Here are the instructions in 5 steps:
  1. Cut two pieces of fleece about three to four inches bigger than you want your finished blanket (dog bed) to be. This extra length accommodates the fringe and knots.
  2. Lay the two pieces together, right sides out.
  3. Go around the square cutting 3-4" fringe through both pieces of fabric.
  4. Once this is done, go around the blanket tying the top and bottom fringe pieces together, nice and tight, into square knots.
  5. If you want to insert batting (to make it a dog bed), simply insert the batting before you've tied up the last side and then finish the tying.
That's it. I tacked down the batting so it wouldn't bunch up during washing but, seriously, it's one of the easiest projects ever and perfect for a child who can handle either scissors or tying.

Also, while it required sewing, I used fleece to turn out a super-fast scarf and "ear muffs" for the Company X mascot. The beauty of this is that the scarf didn't have to be hemmed in any way and I could fringe the ends by simply cutting the fabric into strips. The "ear muffs" took a little more doing but fleece is so forgiving that I think I knocked them out in about 30 minutes total. I didn't even match the thread to the muff color because fleece sort of envelopes the stitches so you don't even see them. Here's a pic of the mascot wearing my creations:


If you have a Facebook account, you can watch the video below of the mascot doing the Gangnam Style dance and then you can get a view of the ear muffs too. Sorry about the tie to FB... we had no other way to link the video but the dance is so hilarious I wanted to, at least, let some of you see it. :)

So, what are your favorite, easy-peasy fleece projects? I'd love to hear because I'd like to add a few more to my arsenal for quick gifts and/or more charity projects.

- Alex